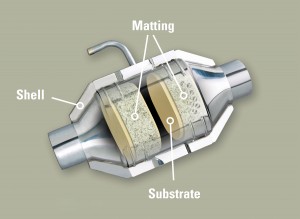
Figure 1 - Matting Wrapped around Substrate (Click to enlarge)

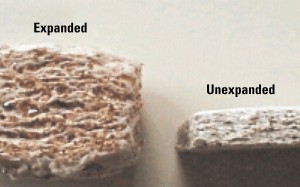
Figure 2 - Converter Matting (Click to enlarge)

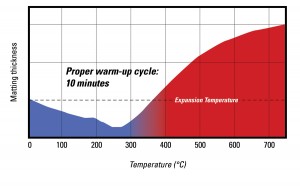
Figure 3 - Matting Expansion Chart (Click to enlarge)
A replacement catalytic converter needs to undergo a proper “break-in” procedure to ensure that it will continue to work the way it is supposed to and deliver the required emissions reliability and long service life. If the converter is not warmed-up properly (broken-in), the substrate inside could be adversely affected and eventually cause the converter to fail down the road.
A proper break-in period is required for a correct installation:
The problem typically occurs when a shop installs the converter and immediately returns the vehicle to the customer without warming up (breaking-in) the cat.
The customer drives away and runs the car for a long distance or lets the vehicle idle for an extended period of time. Under these conditions, the matting, which is intended to secure the substrate will not expand properly and hold it in place.
Converter matting is made from a mineral called vermiculite, which is held together by a fiber mat and an organic binder. This matting is wrapped around the converter’s ceramic brick (See Figure 1).
The matting is installed in the converter in an unexpanded state (See Figure 2). During the first heat up, the fiber mat and binder burn off and the matting actually gets looser before it expands to fill the converter cavity and hold the ceramic brick in place (See Figure 3). If that warm up is not done properly, the brick can come loose and get damaged. That rattle you might hear inside the converter shell is a sure telltale for this problem.
Warm up that cat first.
The best way to avoid this service issue and potential warranty problems is to include the warm-up period as a key part of your overall converter installation procedure. This heating cycle will allow for correct matting expansion.
Here are suggested steps for a proper break-in or warm-up:
- Start engine but do not touch the accelerator pedal.
- Idle the engine and allow it to warm up slowly.
- After 5 minutes, increase the engine speed to 2500 RPM.
- Hold at 2500 RPM for 2 minutes.
- Allow engine to cool down.
- Road test vehicle to confirm correct installation.